Introduction to Site Express
In this introduction to Scan/US Site Express, usually after filling in location information, you will click "Next" and select the kind of area, and the particular reports you will run. Here is something to keep in mind: if these values are already filled out, you can make a report right from page one.
This introduction shows you how to:
- Make a report right away using the current options
- Start Site express
- Read what the current options are
- Make Site Express start automatically when you launch Scan/US.
- Enter locations using an address, latitude/longitude coordinate, or map selection
- Understand how good a job Site Express did at finding the location for the address
- Edit the report title
- Enter locations using Object manager
- Find study areas and ring or drivetime layers created by Site Express
Site Express Start
In Site Express, under the right circumstances you can produce a report (or reports) right away by clicking "Finish".
Look at the "Current Settings" area (big red oval below) to see what area coverage is for - rings or drivetimes. The panel below shows 1,3,5-mile concentric rings.
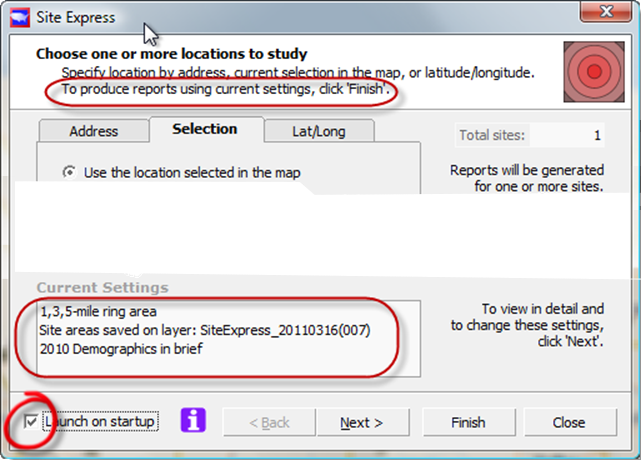
Make a report with current settings (red oval above) by clicking Finish
Starting and re-starting Site Express
To make Site Express start automatically when you start Scan/US, check the Launch on startup box (red circle above).
If you un-check the launch box, the next time Scan/US starts, you will just see the main map, not Site Express.
You can start Site Express anytime from the Reports menu:

Choose "Site Express.." from the Reports menu
More about "Current Settings"
Three things are shown in "Current Settings".
First, the type of area is shown. It can be a ring area, or a drive-time area. For a ring area, the size in miles of the ring radius is shown. For a drive-time, the driving time is shown for the concentric drive-time contours. The current settings here show a 1-3-5-mile ring area.
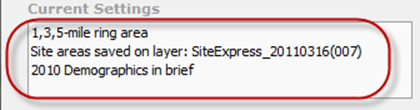
Current settings readout
Second, the name of ring layer is shown. Here, the layer name is SiteExpress_20110316(007), which rather than James Bond's numbered Swiss bank account, is the seventh layer created on March 16, 2011.
Third, is the report (or reports) which will be created when you click the "Finish" button. If you want to choose a different report, or a different report topology or ring size, click "Next" instead of "Finish". If you do not want to produce a report at all, click "Close".
If more than one report has been specified, the "current settings" will have the name of the first report, and a count of others. This way, if you always run the same 3 reports, you will be able to run them from the first page of the Site Express, after you specify your locations.
Where is the saved layer of ring areas?
After you run Site Express, and have created a ring or drivetime layer, you may wish to add the saved layer to a map. If so, look for it in the All Layers tab of the Map Layers Dialog. Click the "+" to expand the 'SiteExpress Sites' heading. Unless you specifically save the layer under a new name, it will be deleted the next time you exit Scan/US. This is to reduce the number of map layers you have to keep track of.
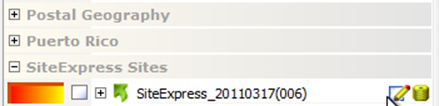
Map menu, Map Layers dialog, "All Layers" tab
Saving Site Express Study Areas
When Site Express runs fewer than six sites, it creates a study area for each site. To avoid cluttering your map window, it does not activate these study areas. To simplify study area management over time, the study areas are not saved from one Scan/US session to the next, unless you activate and save them yourself.
To activate a study area, choose "Open Study Area" from the Map Menu:
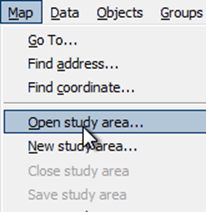
Open Study area..
In "Open Study Area", look for the Site Express Areas created on your date. Click the small "plus" sign to expand the list.
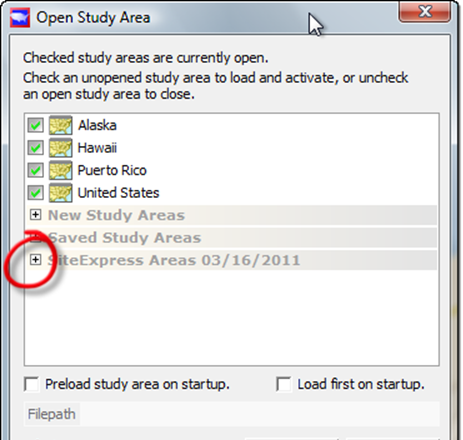
Expand "Site Express Areas" for the current date
After you expand the Site Express Areas list, click the study area you wish to activate, and you will be able to press Activate.

Check the study area to open it
Printing or saving your map
Once you have activated the study area, it will appear as a map and you can save or print it.
To print your map, choose "Print" from the Map menu, and fill in any captions you want printed along with the map.
To save the map, from the Map menu choose "Save Study Area", and then you can open it another time using Open Study Area. However, since it is so easy to re-create the map using Site Express, unless you have customized the map it probably makes more sense not to save it.
Selecting Sites for Site Express
There are 3 ways to add sites to Site Express: using an address, a selection, or coordinates expressed directly in latitude and longitude.
Site Express using an Address
Enter the address where it says "Enter Address or Intersection", and click find. If the address is found exactly, a little push-pin will show right in the center of the target:

When you see this symbol, Site Express thinks it got it exactly right
The number of total sites will be shown as 1 (red circle below). You can add more addresses before you click Finish.
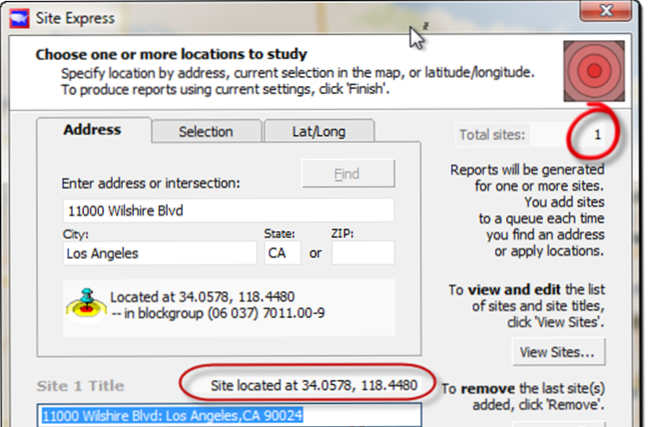
Check "Total Sites:1" (red circle above right) to make sure the site count is correct
Beneath the Address panel, you will be able to edit the site title that will show up in your report. Also shown is the phrase "Site located at ..", which will always appear in the report.
At this point, with one site in the queue, you can click finish and turn out your report using current settings. Or, you can click 'next' to change (or add) reports or settings. Finally, you can add another address into the queue, and run your report for more than one site.
There are several other circumstances which may arise. Site Express may not find the address, it may find more than location, or the location may be less precise than you require.
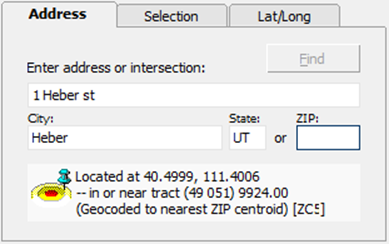
Here, Site Express is using the center point of the nearest ZIP code
If the location is not precise, the blue pushpin will be shown off-target. A message will say "Geocoded to nearest ZIP centroid". It just puts the location in the middle of the ZIP code. A site this inaccurate is probably not too useful. You ought not to proceed. Click the "remove" button to remove the site from the queue.
Sometimes multiple locations are found for a site:
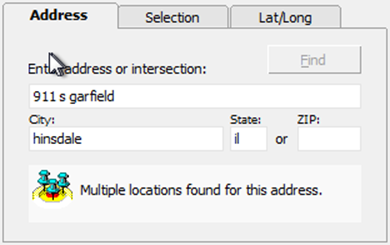
Multiple locations found -- you will need to choose one
Most often the multiple locations are minor variations on the street address. A dialog box will pop up for you to choose the correct one to use in your site.
Finally, either the address, or the city itself, may not be found:
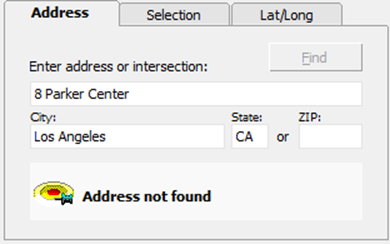
Address not found
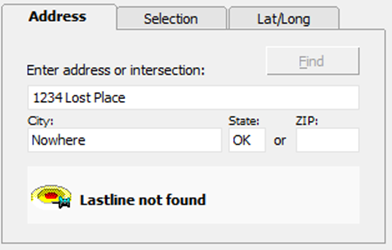
Nothing exists anywhere like that
In this case the address is not added to the Queue, and you can check to see what your typo is. Sometimes, if you specify the ZIP code, it will improve the geocoding of your site location, and you will get a match.
Site Express using a selection
You can enter your sites 3 different ways, using selection. First, you may use the location selected in the map:
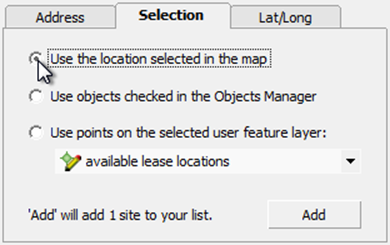
"Selection" tab: use object selected in map
In order to do this, click on the location in the map, and choose the location from the tree of things you can choose. The location will show a highlighted circle around it once you have selected it.

Selecting an object in the map
In addition, you can tell which location is currently selected by looking in the upper right-hand corner of the Scan/US window, where the currently-selected location will be shown:
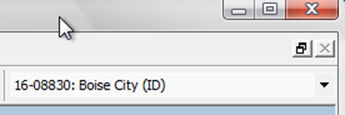
Upper-right corner of Scan/US Window, showing current selection
Once your location is selected, you can click "Add" to add it to the Queue, and then proceed by clicking "Finish", "Next", or by adding another location to the Queue.
Another way to add to the Queue is to add all points on the selected layer:
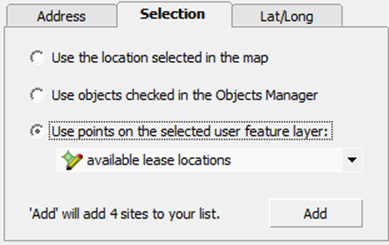
Add all the points on the selected layer
Let us assume that you have already created a layer of four locations, and named it "available lease locations". Use the third option, above, and click "Add" to add all four locations to the Queue.
Finally, you may wish to add only some locations on a layer:
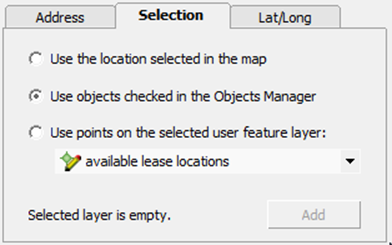
Use the object manager to select just some objects
When you select this option, the Object Manager will appear at the same time, and you must check off objects in the list.
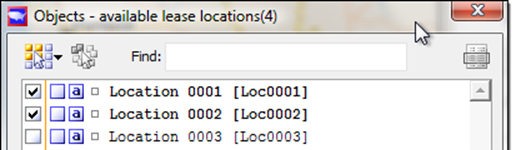
Check objects in the Object Manager, to add to Site express
After you have checked off objects, you will be able to click "Add":
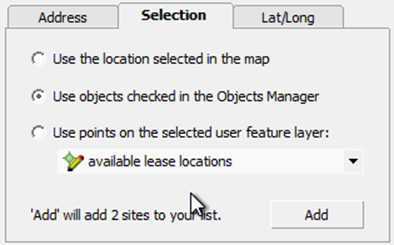
Click Add, after checking off your objects.
After you click Add, you may proceed by clicking "Finish", "Next", or by adding another location to the Queue.
Site Express using a Latitude/Longitude coordinate
Instead of using an address, you can enter your site using latitude and longitude coordinates for your report location(s).
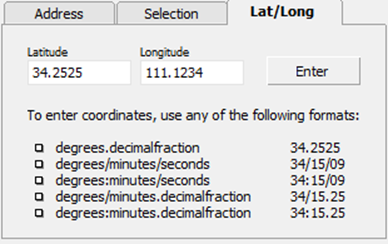
Lat/Lon coordinates tab of Site Express, page 1
Just type the latitude and longitude into the two fields provided, using any of the formats shown, and click "Enter." Then, you will be able to edit the Site Title that will appear on the report.

You can edit the site title: the coordinates will always appear in the report anyway.
You can continue by clicking "Finish", to produce a report with the current settings, or "Next", to change the settings.
It may be useful to enter your site location using latitude and longitude when you have GPS coordinates for a location, or when you are referring to a report that shows latitude and longitude, and you wish to specify the exact same location.
The latitude/longitude coordinates used by Scan/US are the current standard North American Datum, or "NAD 83."