Using Site Express to create concentric rings
This short sequence shows how to create study areas with 1-3-5 rings, using Site Express. Here is what you will do:
- Find two locations, one by street address, the other by latitude/longitude
- make a 1-3-5 concentric ring around each location
- save the study area
- restore the study area(s)
- select the ring and again look at the demographic data for the ring
First, start Site Express
From the Scan/US Reports menu, choose "Site Express"

Choose Site Express... from the Reports menu
The first "Site Express" page, "Choose one or more locations to study" will appear. Here, tabs show three options to enter locations: by street address, by selection (either in the map, by layer, or selected in the Scan/US object manager), or by entering the latitude and longitude directly. In this example, we will use the address tab to enter a street address, and the Lat/Long tab to enter a location, and do site reports for 1-3-5 mile concentric rings.

*Site Express, showing three tabs *
Next, choose two locations
The first location will be the site of the zero milepost marker of the old Spanish Trail in St. Augustine Florida. For this, select the Lat/Long tab and enter the latitude 29:53.911, and the longitude 81:18.849 then press 'enter'. Notice that the "Total sites" counter in the upper right corner of "Site Express" shows a count of one.
This means you have added one site to the list.
To add a location for the second site, click the 'address' tab and enter the address for the historic fort in St. San Antonio Texas: 300 Alamo Plaza, San Antonio, TX. Click 'find'. Notice that you can give the site a title under 'site 1 title' which is different from its default address. Change the title to read "The Alamo". Notice that the "total sites" counter now reads "2".
Look at the site list
On this page of "Site Express" you can click the "View sites" button, and change the name of the first site to "milepost zero". To do this click right on the text that says "Site located at" next to site 00001, to select it. Once the text is highlighted, click the 'Edit' button at the bottom of the "site express-view sites" box. The "edit site titles" will come up and let you edit the title to read whatever you want. We are going to put in "Milepost Zero, old Spanish Trail", and then click 'OK'.
With our list of two locations properly titled and geocoded to latitude and longitude, we are ready to proceed to the next step.
Click the "Next" button at the bottom of Site Express.
Important note: Before you click NEXT, make sure you have added sites. If it still says "Total sites: 0", you will have a problem a couple of pages later and you will have no idea why. So, before you click NEXT, here, make sure you have at least one site specified.
Rings or drivetimes?
Here you will define the shape of the site area: rings or drivetimes, and how many of each.

Define the shape of the site area: Rings
Here again you have three tabs you can choose, to select the kind of site area you want to put into the map: three-ring-areas, drivetime, and rings/sectors. Rings/Sectors does not work yet. Click on three-ring-areas, and enter the numbers 1,3 and 5 for the ring sizes.
Notice that there is a question "how do you want to report data for these areas?" You should choose "as concentric areas", as this is the most common interpretation of what concentric rings mean on the map. If, instead, you wanted to have the data shown for the "bands", you would click next to the phrase "by component subareas".
Annulus vs. ring area
When you choose "concentric areas", the current settings panel will show 1-3-5 mile RING area. When you choose "component subareas", the current settings panel will show 1-3-5 mile ANNULUS area.
Source layer specified
On the right of "Site Express", it says "data for the site areas will be aggregated from micro grids and specified point layers". The word "specified" is highlighted in blue, but at the moment this does mean anything. If you click it nothing will happen.
Checkbox: 'launch on startup'
By the way, notice in the lower-left of site express, where there is a checkbox next to the sentence "launch on startup". Check this box in order to start site express automatically as soon as Scan/US begins. This is a useful box if you only produce pre-formatted site reports, and never use any of the other analytic tools in Scan/US.
Choose reports to print
Now you have defined the shape of the site areas that will be produced for the two site locations.You can click the "next" button to go to the next panel and choose the reports which will print.
Let's choose a report showing demographic trends. Click the small plus sign next to the line "demographic trends", and it will open the list to show a report entitled "demographic trends 2000-2011-2016". Click the checkbox next to this report title: notice that "Site Express" shows in the upper right, two objects, two reports, for a total of 8. This is the number of pages we expect to come out of the printer. (Although in fact twenty-four pages will appear, 4 pages for each ring around 2 objects.)
Output options
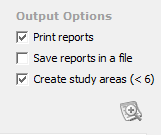
Three output options are shown. Make sure there is a checkbox next to "print reports", and next to "create study areas, less than six". Let's pause a moment to ask the meaning of this last checkbox. This means that when site express is running fewer than six sites, it will create a study area for each site.
Finding the new study areas created by Site Express
You will be able to find these study areas in two ways: in the Open Study Area box (Map Menu), and by looking on the Scan/US window menu:
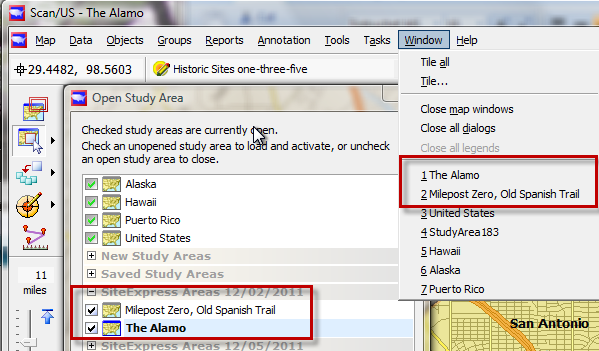
Window menu or Open study area
Note: these study areas, found under the Window menu, will not be saved automatically. You will need to save them, choosing "Save Study Area..." from the Map menu.
Site Express output options (click 'plus' magnifier to see sample report)
However, Scan/US will not make study areas for each site unless you check this box. And Scan/US will not make study areas for each site if you are running six or more sites through site express. This is intended to keep your Scan/US installation from clogging up with gazillions of study areas.
Before we move on, notice the "plus sign" in the magnifying glass at the lower right of the clip above. This is a button you push to see a preview of what each report looks like, before you print it.
Okay! There isn't anything left to specify. All we have to do now is click the "finish" button. If you have your Scan/US set up for PDF printing, the PDF printer will come up and you can name your output file appropriately. We are going to call our file "Two Historic Locations.PDF" and save it. It is two 12-page reports combined into 1 PDF file (yay!), showing very complete demographic trend information for the Alamo and for the location of milepost zero of the old Spanish Trail.
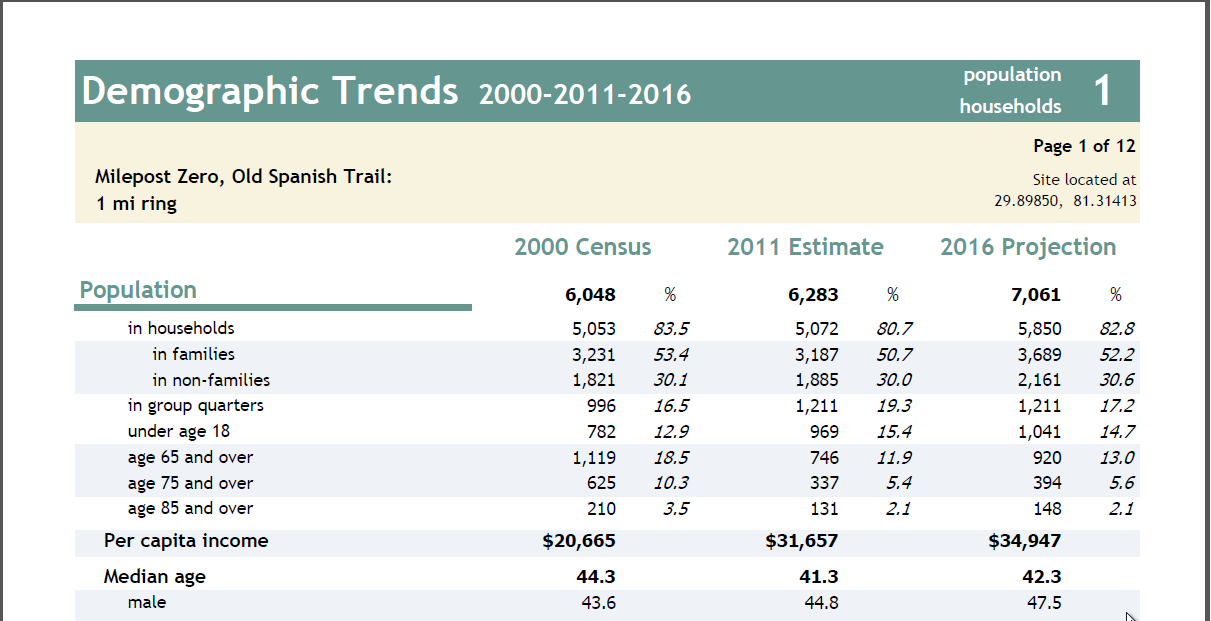
Demographic report
That's great! But what about the maps? And what about the locations? Can we save them, so that we can refer back to them and not have to enter this information again? Yes we can.
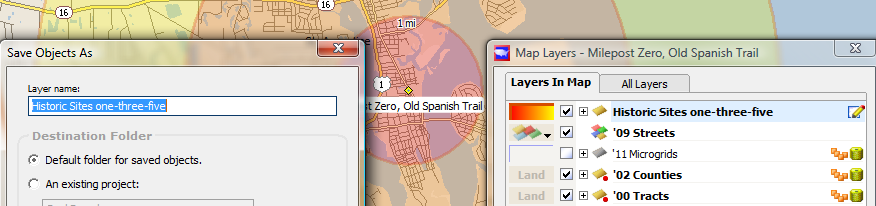
From the window menu, notice at the bottom two new study areas choose named after how we named our sites. Choose the one called "milepost zero, old Spanish Trail". You will see rings centered on a location in St. Augustine. This is milepost zero. From the map menu choose "Map layers". You will see a list of layers in the map, and one of them will be called something like "site express_20111202". That layer is your areas, or "sites" layer. Normally these site layers are discarded by Scan/US unless you save them. First, let's save this layer, and save the study area, and then we'll see where they can be found in case we want to use them again.
Study Area
To save this site express layer, it's convenient to first rename it to something easily remembered: click on the layer name in "map layers", and then bring up the context menu by right clicking the name. Choose "Properties.." from the context menu, type in a new layer name. We are going to call it "Historic sites 1-3-5". Press "enter" on your keyboard and click the "close" button. You can see in Map Layers that the layer has been renamed. When you rename a layer like this, it is automatically saved. You will notice on the Scan/US "objects" menu that the save command is grayed out when the layer is selected.
To save this study area, from the Scan/US map menu, choose 'Save Study Area...' and click OK. Let's do the same thing with the other study area "the Alamo": select that study area from the "Window" menu, and from the Scan/US map menu choose save study area again, and again click OK.
Before you close and restart, as an exercise in finding our study areas and layer again, let's look at the data in the rings around the Alamo. Choose the "select object mode", which is the second mode button from the top, located underneath the latitude/longitude readout in the upper left-hand corner of the Scan/US screen.

Choose 'select object mode' ... from the mode buttons panel at left
Now that you are in "select object mode", click anywhere within the ring on the map, and from the object menu tree which appears, choose the Alamo ring. From the Scan/US "data" menu choose "Quicklook", and you can see the demographic values for that ring. These values SHOULD restore to this area when you restart Scan/US.
Now, you have saved both rings and study areas. Let's close Scan/US and restart. From the "Map" menu choose exit. Then, restart Scan/US.
Notice that if you had checked the "launch on startup" checkbox insight express, that Site Express has now started up. Since we don't need at this point you can just click the "close" button in Site Express.
Let's open our St. Augustine study area. From the "Map" menu, choose "open study area.."

Click the 'plus' next to SiteExpress Areas
You will see in Open Study Areas a line for a 'Saved study areas' and a line for "SiteExpress Areas 12/02/2011" or whatever date you are doing this exercise. Click the plus sign next to "SiteExpress Areas 12/02/2011", and it will expand to show the names of study areas which you have created. At some point, you will be able to move the study areas within this Open Study Area dialogue, by right clicking on the category and choosing "Move to..". However, this does not work yet.
Choose the check box next to "The Alamo", and a map of the study area will appear. It will have your ring area.
Make sure to choose "select object mode" in the upper left

Choose 'select object mode' ... from the mode buttons panel at left
Select the five-mile Ring
Click within the ring and select "The Alamo five-mile ring".

Select 'The Alamo' from the object selection menu
When you select 'QuickLook' from the data menu, the demographics for the 5 mile ring around The Alamo will be shown.
In conclusion
At this point, you have seen how to create areas -- concentric areas -- within study areas created by Site Express, save those areas, bring them back up again, select them, and look at the demographics within.
If you need to access the reports again for the same areas, you could have selected the 'save in Excel' option. Alternately, you can choose 'report outputs folder' from the reports menu, and go to the date on which you ran the reports.
* * *